Azure Application Gateway: When to Use It and How to Set It Up
In this article
Azure Application Gateway: When to Use It and How to Set It Up
Azure has five load balancing services and choosing the wrong one is a common source of confusion. Application Gateway sits in a specific lane: regional, HTTP(S)-aware, with WAF built in. This post covers what it does, when it's the right pick, and how to stand one up.
What Is Application Gateway?
Application Gateway is a web traffic load balancer that operates at OSI Layer 7 (the application layer). Unlike Azure Load Balancer, which routes based on IP address and port, Application Gateway makes routing decisions based on HTTP request attributes: URL paths, host headers, cookies, and more.
It acts as a terminating proxy: the client connects to the gateway, and the gateway opens a separate connection to the backend. That's what makes SSL offload, WAF inspection, and header rewriting possible. Your backend servers never touch raw internet traffic.
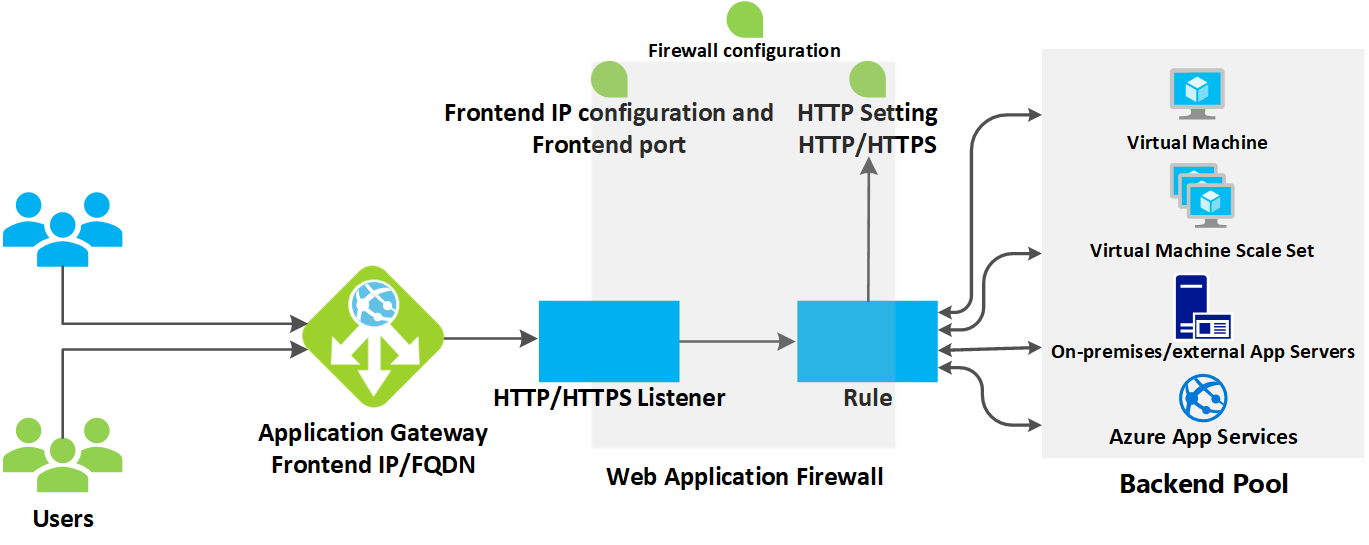
Here's what it gives you, per the Azure Application Gateway features docs:
| Feature | What It Does |
|---|---|
| SSL/TLS Termination | Terminates HTTPS at the gateway; backends can run HTTP, removing encryption overhead from your servers. End-to-end TLS is also supported if required. |
| Web Application Firewall (WAF) | OWASP core rule sets (3.1, 3.0, 2.2.9), bot protection via Microsoft Threat Intelligence, DDoS application-layer protection. |
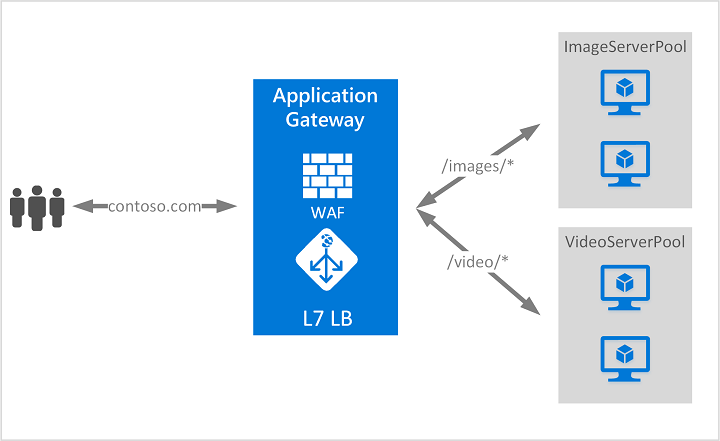
| URL-Based Routing | Route /images/* to one backend pool and /video/* to another based on path. |
| Multi-Site Hosting | Host 100+ websites on a single gateway, each routing to its own backend pool by hostname or domain. |
| Autoscaling | Standard_v2 scales with traffic automatically. No instance count to tune during provisioning. |
| Zone Redundancy | Standard_v2 spans availability zones; no need to deploy separate gateways per zone. |
| Session Affinity | Cookie-based sticky sessions keep a user on the same backend server. |
| HTTP Redirection | Global or path-based HTTP-to-HTTPS redirection built in; no dedicated redirect pool needed. |
| Header & URL Rewriting | Add, remove, or modify HTTP headers and URLs; supports conditional rewrites. |
| AKS Ingress (AGIC) | Application Gateway Ingress Controller lets AKS use Application Gateway as the cluster ingress. |
| WebSocket / HTTP/2 | Native support for both protocols with no extra configuration. |
| Connection Draining | Gracefully removes backend pool members during updates; in-flight requests finish before the node is pulled. |
| Private Link | Connect to backends privately; fully private-only deployment (public preview). |
When to Use Application Gateway vs. the Alternatives
Azure's load balancing decision tree (Load balancing options) comes down to three questions: Is the traffic HTTP(S)? Is the app internet-facing? Is it regional or global?
| Scenario | Right Tool | Why |
|---|---|---|
| Internal web app, no internet exposure | Load Balancer | Layer 4, low overhead, no HTTP awareness needed |
| Internet-facing web app, single region, needs WAF or URL routing | Application Gateway | Layer 7, regional, WAF, path-based routing |
| Internet-facing web app, multi-region, needs global failover and CDN | Azure Front Door | Global, CDN, anycast routing, WAF at the edge |
| Multi-region with WAF and per-request Layer 7 processing | Front Door + Application Gateway | Front Door for global routing; App Gateway for per-region deep inspection |
| DNS-based global routing, no TLS termination needed | Traffic Manager | DNS load balancing only, no traffic proxying |
| HTTP API gateway with rate limiting, auth, transformations | API Management | API-specific; not a general-purpose load balancer |
| TCP/UDP traffic or non-HTTP workloads | Load Balancer | Layer 4, handles any TCP/UDP protocol |
| Kubernetes ingress in AKS | Application Gateway (AGIC) or App Gateway for Containers | Native AKS integration |
Use Application Gateway when:
- Your workload is HTTP(S) and lives in a single region
- You need WAF to protect against OWASP exploits and bots
- You need path-based or host-based routing to different backends
- You want TLS termination in one place instead of managing certs on every backend
- You're running multi-tenant or multi-app deployments on shared infrastructure
Don't use Application Gateway when:
- You need global load balancing. Use Front Door instead (or Front Door in front of Application Gateway).
- Your workload is TCP/UDP with no HTTP involvement. Use Load Balancer.
- You only need DNS-level routing without traffic proxying. Use Traffic Manager.
SKU Comparison
| Standard_v2 | WAF_v2 | Basic (Preview) | |
|---|---|---|---|
| Autoscaling | ✅ | ✅ | ✅ |
| Zone redundancy | ✅ | ✅ | ❌ |
| Web Application Firewall | ❌ | ✅ | ❌ |
| Static VIP | ✅ | ✅ | ❌ |
| AKS AGIC support | ✅ | ✅ | ❌ |
| Use case | General web apps | Apps needing WAF | Dev/test, simple scenarios |
For production internet-facing workloads, use WAF_v2. For internal apps that don't face the internet, Standard_v2 is fine.
Setup Guide
Everything below follows the official Microsoft quickstart. By the end you'll have a working Standard_v2 gateway with two backend VMs, a routing rule, and a public endpoint you can hit from a browser.
Prerequisites
- An Azure subscription (create a free account)
- Access to the Azure portal
Step 1: Create a Resource Group and Virtual Network
Application Gateway requires its own dedicated subnet separate from backend targets.
- In the Azure portal, search for Resource groups and select + Create
- Fill in:
- Subscription: your subscription
- Resource group:
myResourceGroupAG - Region: choose a region; use the same for all resources in this guide
- Select Review + create, then Create
- Navigate into the new resource group and select + Create
- Search for Virtual Network and select Create
- On the Create virtual network page:
- Name:
myVNet - Region: same as above
- Name:
- Select Next > Next to reach the IP Addresses tab
- Set the address space to
10.21.0.0/16 - Add a subnet:
- Subnet name:
myBackendSubnet - Starting address:
10.21.1.0 - Subnet size:
/24
- Subnet name:
- Select the default subnet, edit it: rename to
myAGSubnet, set starting address to10.21.0.0, size/24, then Save
Application Gateway must be in its own subnet (
myAGSubnet). Virtual network service endpoint policies are not supported in an Application Gateway subnet.
- Select Review + create, then Create
Step 2: Create the Application Gateway
-
Search for Application Gateway in the portal and select + Create > Application Gateway
-
On the Basics tab:
Setting Value Subscription Your subscription Resource group myResourceGroupAGApplication gateway name myAppGatewayRegion Same as resource group Tier Standard V2 Virtual network myVNetSubnet myAGSubnetStandard_v2 is zone-redundant by default in regions with multiple availability zones.
-
Frontends tab: verify Frontend IP address type is set to Public, then select Add new for the public IP and name it
myAGPublicIPAddress -
Backends tab: select Add a backend pool:
- Name:
myBackendPool - Add backend pool without targets:
Yes(you'll add VMs after creating the gateway) - Select Add
- Name:
-
Configuration tab: select Add a routing rule:
- Rule name:
myRoutingRule - Priority:
100(range: 1 = highest, 20000 = lowest) - On the Listener sub-tab:
- Listener name:
myListener - Frontend IP:
Public IPv4
- Listener name:
- On the Backend targets sub-tab:
- Target type: Backend pool
- Backend target:
myBackendPool - Backend settings: select Add new
- Backend settings name:
myBackendSetting - Backend port:
80
- Backend settings name:
- Select Add to save the routing rule
- Rule name:
-
Select Next: Tags, then Next: Review + create, then Create
Deployment takes a few minutes. Wait for it to complete before continuing.
Step 3: Add Backend Targets
In this example, two VMs serve as the backend. You'll create them, install IIS to verify routing, and add them to the backend pool.
Create the first VM
-
In the portal, select Create a resource > search for Windows Server 2022 Datacenter
-
On the Basics tab:
Setting Value Resource group myResourceGroupAGVirtual machine name myVMRegion Same as the gateway Username An admin username Password A strong password Public inbound ports None -
Accept Disks defaults, select Next: Networking
-
On Networking: set Virtual network to
myVNet, Subnet tomyBackendSubnet, Public IP to NoneApplication Gateway can communicate with instances outside its VNet, but you need IP connectivity. Placing backends in the same VNet is simplest.
-
Select Next: Monitoring, set Boot diagnostics to Disable, then Review + create > Create
-
Repeat to create a second VM named
myVM2with the same settings
Install IIS on both VMs
From Azure Cloud Shell (PowerShell):
Set-AzVMExtension `
  -ResourceGroupName myResourceGroupAG `
  -ExtensionName IIS `
  -VMName myVM `
  -Publisher Microsoft.Compute `
  -ExtensionType CustomScriptExtension `
  -TypeHandlerVersion 1.4 `
  -SettingString '{"commandToExecute":"powershell Add-WindowsFeature Web-Server; powershell Add-Content -Path \"C:\\inetpub\\wwwroot\\Default.htm\" -Value $($env:computername)"}' `
  -Location EastUS
Repeat with -VMName myVM2.
Use Azure Bastion to connect interactively to the VMs if needed. The default NSG blocks all inbound internet traffic including RDP.
Add VMs to the backend pool
- Navigate to myAppGateway > Backend pools > myBackendPool
- Under Backend targets, set Target type to
Virtual machine - Add both
myVMandmyVM2with their associated NICs - Select Save
Step 4: Test
- Go to myAppGateway > Overview and copy the public IP address (or search for
myAGPublicIPAddressin All resources) - Paste the IP into a browser. You should see the hostname of one of your VMs.
- Refresh several times to see connections round-robin between
myVMandmyVM2
Migrating from NetScaler (Citrix ADC)
If you're moving workloads off a Citrix ADC or NetScaler appliance, Application Gateway covers most of the core ADC functionality for HTTP(S) traffic. The conceptual model is similar, but the terminology is different and a few NetScaler capabilities don't have a direct equivalent.
Terminology Mapping
| NetScaler Concept | Application Gateway Equivalent | Notes |
|---|---|---|
| Virtual Server (vServer) | Listener | A listener defines the frontend protocol, port, and certificate |
| Service / Service Group | Backend Pool | A backend pool holds your servers, VMs, FQDNs, or IPs |
| Load Balancing Policy | Routing Rule + HTTP Settings | Rules bind listeners to backend pools; HTTP settings control probe and timeout behavior |
| Content Switching vServer | Path-based or multi-site routing rule | Use path maps for URL routing, multi-site listeners for hostname-based routing |
| SSL Offload | TLS Termination | Terminate HTTPS at the listener; backends communicate over HTTP; upload cert to listener or reference Key Vault |
| Rewrite / Responder Policies | Header & URL Rewrite Rules | App Gateway supports conditional rewrite of request/response headers and URL path/query string. See Rewrite HTTP headers and URL |
| AppFirewall | WAF (WAF_v2 SKU) | OWASP core rule sets, custom rules, bot protection, DDoS. Uses WAF Policy resource rather than inline config |
| Persistence Group | Cookie-based Session Affinity | App Gateway sticky sessions use a gateway-managed cookie per listener, not cross-app groups |
| LDNS / Health Monitor | Health Probe | Custom probes on App Gateway let you specify path, expected status codes, and interval |
| GSLB | Azure Front Door or Traffic Manager | App Gateway is regional only; for global load balancing, put Front Door upstream or use Traffic Manager |
What NetScaler Does That App Gateway Handles Differently
Source IP visibility: NetScaler can preserve the original client IP at Layer 4. Application Gateway, as a terminating proxy, replaces it. The original IP is forwarded in the X-Forwarded-For header, so your backend applications need to read that header instead of the TCP source. If your app or backend firewall relies on source IP matching, plan for this.
TLS policy and cipher suites: NetScaler supports a broad range of cipher suite configurations including legacy suites for older clients. Application Gateway enforces a minimum TLS policy of TLS 1.0 by default but the recommended production setting is TLS 1.2+. If you're serving legacy clients that can only negotiate older ciphers, review the App Gateway SSL policy options before cutting over.
Authentication offload: This is the biggest gap. Citrix ADC supports nFactor authentication, SAML, LDAP, RADIUS, and client cert auth natively at the ADC level. Application Gateway does not offload authentication. If your NetScaler is handling SSO or protecting apps with AAA policies, you'll need to replace that capability with Microsoft Entra ID Application Proxy (for internal apps) or integrate auth directly into the application. This is often the longest part of a NetScaler-to-Azure migration.
TCP/UDP load balancing: NetScaler handles both HTTP and non-HTTP protocols on the same appliance. Application Gateway is primarily HTTP(S), though the v2 SKU includes a TCP/TLS proxy in preview. For non-HTTP workloads, you'll need Azure Load Balancer in parallel.
Compression and caching: NetScaler supports HTTP response compression and caching. Application Gateway does not. If you're relying on ADC-level compression, move that to the application tier or use Azure CDN/Front Door in front.
Migration Approach
The safest path is a parallel deployment with DNS-based traffic shifting rather than a hard cutover.
-
Audit the current NetScaler config. Export all vServer definitions, content switching policies, SSL certificates, persistence settings, and health monitors. Tools like
show running configon the CLI or Citrix ADM can export this to a readable format. Map each vServer to a planned App Gateway listener. -
Export SSL certificates. For each certificate bound to a vServer, export the private key and certificate chain as a PFX. You'll upload these to App Gateway listeners or store them in Azure Key Vault and reference them from the listener.
-
Build the App Gateway config in parallel. Create the gateway, configure listeners to match your existing hostnames and ports, create backend pools pointing to the same servers, and set up routing rules, rewrite rules, and health probes to match what NetScaler was doing. At this stage, no traffic touches it yet.
-
Test against the new gateway directly. Update a single hosts file entry (or a test DNS record) to point at the new gateway's IP and run through your application manually. Validate HTTP-to-HTTPS redirects, session behavior, and header values.
-
Shift traffic incrementally. Update DNS TTL to a low value (60 seconds) a few hours before cutover. When ready, update the DNS A record or CNAME to point at the Application Gateway public IP or DNS name. Monitor backend health in the Azure portal and watch for 502/504 errors in Application Gateway access logs.
-
Burn-in and decommission. Leave the NetScaler in place with the old IP until you're confident traffic is stable. Once you're satisfied, decommission it.
Things to Check Before Cutover
- Verify that all backends return healthy probe responses through the new gateway (check Backend health under the App Gateway resource)
- Confirm
X-Forwarded-Foris being read correctly by applications that depend on client IP - Test certificate chain validity; App Gateway validates the full chain for end-to-end TLS backends
- If the NetScaler was doing any TCP-level connection multiplexing or keep-alive pooling your app depended on, test connection behavior carefully since App Gateway manages backend connections independently
What to Do Next
A working gateway over plain HTTP is a starting point, not a production configuration. Here's what to layer on:
- Enable WAF: upgrade to WAF_v2 and turn on OWASP rule sets, bot protection, and custom rules. If your app is internet-facing, this isn't optional.
- Add TLS: follow the TLS termination tutorial to add an HTTPS listener and offload certificate management to the gateway instead of every backend.
- URL-based routing: split traffic by path so
/api/*goes to one backend pool and/static/*goes to another. Cleaner than trying to do this in application code. - Multi-site hosting: one gateway can serve 100+ domains, each with its own backend. Much cheaper than a gateway per app.
- Front Door in front: if you need global reach, put Front Door upstream. Front Door handles global routing, CDN, and anycast; Application Gateway handles per-region WAF and Layer 7 inspection behind it.
Clean Up
To avoid ongoing charges, delete the resource group when you're done testing:
- In the portal, navigate to Resource groups > myResourceGroupAG
- Select Delete resource group
- Type
myResourceGroupAGto confirm and select Delete
Sources: Azure Application Gateway overview, Application Gateway features, Load balancing options, Quickstart: Direct web traffic with Azure Application Gateway, Rewrite HTTP headers and URL, Application Gateway SSL policy overview